The RaspberryPi is a single-board computer developed in the UK by the Raspberry Pi Foundation with the intention of promoting the teaching of basic computer science in schools. The Raspberry Pi has a Broadcom BCM2835 system on a chip (SoC), which includes an ARM 700 MHz processor , VideoCore IV GPU and 512MB RAM. .The supported OS for the Raspberry PI is Raspbian a Debian based distribution which we have also used in this article.
The Moway Robot Development team has been working on a release of Moway+Scratch software for the Raspberry PI. In this blog entry we are going to provide an step by step guide for setting up the connection and some possibilities of this tool. The needed materials are: raspberry PI (with accessories like: SD card, Ethernet connection, ..) and Moway + Scratch Kit
From our website it is also possible to download the Moway + Scratch Guide
Introduction
The mOway robot is controlled from the Scratch environment using a number of different commands. A command is an order written in Scratch and sent to the robot. When the robot receives this order, it performs the ordered action. For example, if we want the robot to advance, we must write the “go” command in Scratch. When we execute this command, the robot will receive this order and its wheels will activate.
On the other hand, the mOway robot is equipped with a number of different sensors. A sensor is an electronic device used to measure the surrounding conditions. For example, mOway is fitted with obstacle sensors to detect objects in front of the robot, a light sensor to detect whether it is daytime or night time and a temperature sensor, etc. The robot sends the values detected by its sensors to the Scratch environment on a continuous basis.
Both the commands and the values detected by the sensors are sent by radiofrequency (RF). The mOway robot and the Scratch environment exchange messages wirelessly. These messages are managed through the “mOway Scratch” application, which connects Scratch to the robot.
Installation
First we have to switch the raspberry PI on and run a terminal (LXTerminal). It is recommended to update the system before installing mOway Scratch. Then we will download the .deb file and install it, typing this commands in the terminal.
pi@raspberrypi ~ $ sudo apt-get update
pi@raspberrypi ~ $ sudo apt-get upgrade
pi@raspberrypi ~ $ wget http://moway-robot.com/mowayscratch_1.0_armhf.deb
pi@raspberrypi ~ $ sudo dpkg -i mowayscratch_1.0_armhf.deb
Once installed we can run mOwayScratch from the Programming or Education section. Once mOwayScratch is opened, a new folder will be created in /home/$user/Documents/Scratch Projects/MowayRobot path with some example projects, costumes and backgrounds. The practice book exercises will be also installed.
In order to connect Moway and Scratch, a firmware must be downloaded into the robot. We must connect Moway Robot to the USB port and press Program button. The channel number in the right sets the RF channel in which Moway works. This feature allows users to work at the same time without interferences if they work in different channels. There is no need to repeat this operation unless the RF channel wants to be changed.
NOTE: As the Raspberry PI USB port can supply 100 mA only, it is highly recommended to use an externally powered USB HUB.
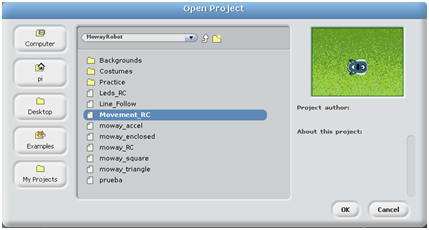
Once Moway Robot is programmed we run Scratch and select File Open and Movement_RC project.
Next we connect RFUSB to the Raspberry PI
and with the robot switch in On position we press “Connect to Channel”.
Both the images and the arrows will turn green in case the connection is successful. Once the connection is established we can minimize the application which will continue running and providing an interface between Moway and Scratch.
Back to Scratch, the Movement_RC project works as a RadioControl Car. When the up arrow is pressed Moway Robot will move straight, if left or right arrows are pressed Moway will turn 90 degrees left or right and if the down arrow is pressed Moway will stop.
Next, we recommend downloading Moway + Scratch Guide for further practice and guides. In the video below some other practices of Moway + Scratch are shown.


No hay comentarios:
Publicar un comentario